Remove Mac Apps
A Technical Site Providing Uninstall Tutorial For Mac OS X
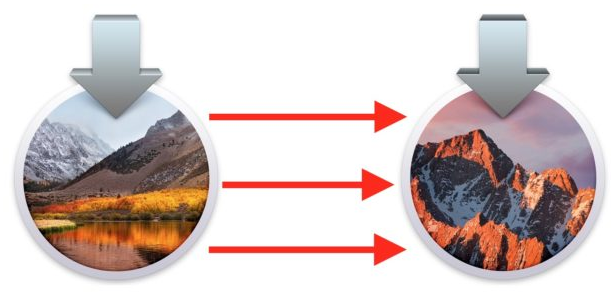
How to Downgrade macOS High Sierra to macOS Sierra
- Catherine
- Jul 11,2017
- 4220
In previous posts we discussed how to download and install macOS High Sierra developer beta as well as public beta. Betas are usually unstable and have some bugs. That’s why it is not recommended to install a beta on a primary device.
If you have installed the latest beta of macOS 10.13, and later you would like to roll macOS High Sierra beta back to the more stable macOS Sierra, well, you can easily restore the previous system. This post will show you how to downgrade macOS High Sierra (both the developer and public betas) to macOS Sierra. First of all, make sure to connect your Mac to power as it will take some time to complete the process.
To restore your personal files, apps and settings, you will need the Time Machine backup that you created before you installed the public beta. Beside, you may want to make another Time Machine backup on macOS High Sierra to keep the files you created or modified after the installation of macOS 10.13 beta. Now here we go.
Pre-preparation: Back up your Mac (if necessary)
To backup with Time Machine, connect an external hard disk to your Mac, then head to Apple menu > System Preferences and select Time Machine icon. As Time Machine launches, turn the slider from Off to On, click Select Backup disk button and choose the disk. Time Machine will format the external disk and start backing up.
If you just want to keep some important files, you can simply select the items in Finder, and drag them onto an external storage device to make copies for later use.
How to Erase macOS 10.13 & Restore to Previous macOS?
Once you have made a backup copy of the system or any file you want to keep, you can erase macOS High Sierra and then perform a direct restore from Time Machine, on condition that you have backed up the previous macOS you want to roll back to.
> Restart into macOS Recovery
1. Connect to the external Time Machine volume to your Mac.
2. Head to the Apple menu and choose Restart to reboot your Mac.
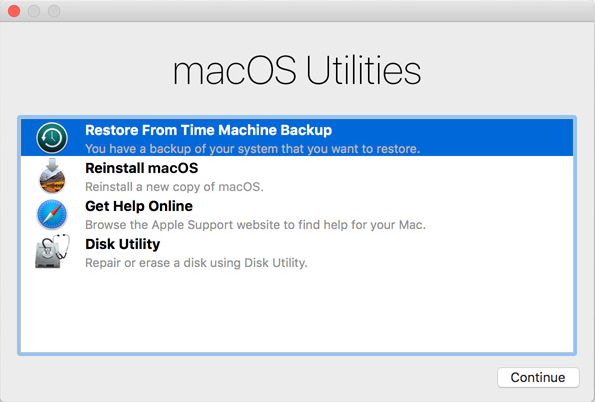
3. While it is restarting, hold Command + R to bring up the macOS Utilities window.
> Erase macOS High Sierra Beta
4. Choose the Disk Utility option, and click Continue button to proceed.
5. Select the hard drive/partition macOS High Sierra was installed on, and click Erase.
6. Type a new name for the drive, then select Mac OS Extended (Journaled) as the file system format, and click Erase. Note that this act will remove all data on the drive.
> Restore from Time Machine Backup
7. Choose the Restore From Time Machine Backup from the list, and click Continue.
8. Choose the external volume that appears as the backup source and click Continue.
9. Select the backup you want to restore from the list, and then click Continue.
10. Select the drive or partition you formatted in step 6 as the destination to restore the the Time Machine backup to, then click Restore and then confirm the change.
As the restore process completes, your Mac will reboot automatically, with macOS High Sierra beta being removed from the drive and the prior macOS version being installed to the formatted drive. So the process is: backup > erase & format > restore.
Since macOS High Sierra uses the APFS file system while the previous versions of macOS/Mac OS X use HFS format, downgrading from macOS High Sierra to macOS Sierra/Mac OS X will require you to format the hard drive back to the prior file system. If you are downgrading, for example, from Sierra to EI Capitan, you can skip step 4-6 and simply restore from a Time machine backup (step 1-3 & 7-10).
The final release of macOS 10.13 High Sierra will be available in this fall.
Leave your comments here:
Recent posts
Categories
- Apple Infos (19)
- Application Guides (8)
- How-to Guides (25)
- Mac Apps (3)
- Mac Hardware (1)
- Mac Tips & Tricks (11)
- macOS (12)
- Security Issue (11)
- Tech News (14)
- Uninstall Tutorials (48)
Archive
- August 2021
- June 2021
- April 2021
- March 2021
- February 2021
- January 2021
- December 2020
- November 2020
- October 2020
- September 2020
- March 2020
- February 2020
- September 2018
- August 2018
- July 2018
- June 2018
- May 2018
- April 2018
- March 2018
- February 2018
- January 2018
- December 2017
- November 2017
- October 2017
- September 2017
- August 2017
- July 2017
- June 2017
- May 2017
- April 2017
- March 2017
- February 2017
- January 2017
- December 2016
- November 2016
- October 2016
- September 2016
- August 2016
- July 2016
Comments