Remove Mac Apps
A Technical Site Providing Uninstall Tutorial For Mac OS X
Automator: Create Workflow to Resize Photos in Batches
- Catherine
- Oct 18,2016
- 1808
In daily life we may need to resize a bulk of images often. For instance, you may need to scale down a high-resolution photo to 600 pixels wide so that you can upload it quicker. You may get used to resize images using Preview or other 3rd-party apps like Pixelmator. But here I would like to introduce a time-saving way to complete the task.
Adjusting the size of images one by one can be quite tedious especially when you are dealing with thousands of pictures. Have you thought about resizing images in batches by creating a handy image resizing service on your Mac? Automator is a pre-installed application in Mac OS that allows users to create workflow for automating repetitive tasks into batches. If you have not used this tool before, you can get to know this handy app and learn how to use it to resize images in this tutorial.
Here are the detailed steps you can take to resize bulks of images in seconds.
- Open Automator from the Applications folder, Launchpad, or Spotlight.
- When you are asked to choose a type for your documents, choose “Folder Action”.
- Click on the “Choose” button to create a workflow.
- Drag and drop the images you want to resize into the right panel.
- Select “Photos” in the left panel, drag “Scale Images” and drop it to the workflow.
- Choose “Add” or “Don’t Add” when asked if you want to add the copies of images.
- Choose “To Size (pixels)” or “By Percentage” under the “Scale Images”, and enter your desired size for the images. Then click on the Run button on the top-right corner.
You can also create an application workflow to handle the task of resizing images.
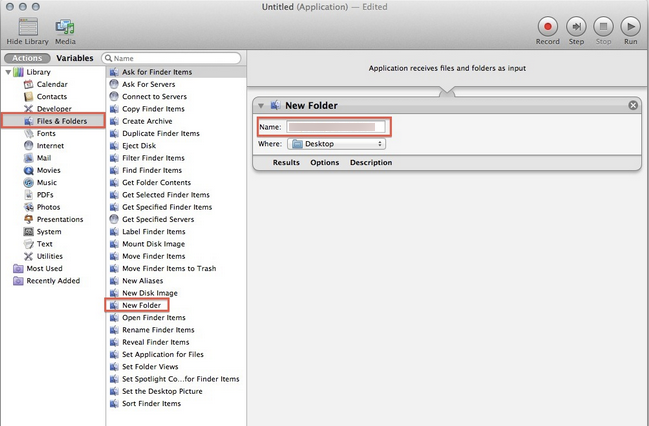
- Open Automator, select “Application” for the type of document and click “Choose”.
- In the left panel, select “Files and Folders”, and locate the “New folder” action in the center panel. Then drag and drop “New folder”into the workflow on the right panel.
- Now you can change the “Name” of this folder and “Where” it will be created.
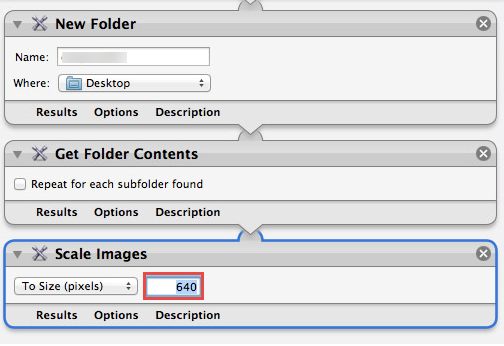
- Under the “Library” menu in the left panel, choose “File & Folders” > “Get Folder Contents”, and drag it to the workflow below the “New folder”.
- Again, select Photos > Scale Images and drag it to the workflow.
- When prompted to add a Copy Finder Items action, choose “Don’t Add” if you don’t want to make a copy, or “Add” if you want to preserve original images in the folder.
- Enter the desired width for the images in the text box under “Scale Images (pixels)”.
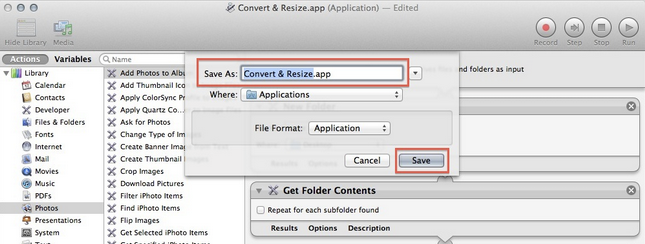
Now you have created a workflow for image resizing. Press Command + S keys to save this workflow, give it a descriptive name, and save it to your desired location. To resize the images to your designated pixels, you only need to drag those images onto the Automator’s Dock icon, and later you will get a new folder filled with copies of selected images with each one scaled to a dimension of your desired pixels.
Using the built-in Automator to resize batches of image is quick, easy and free. You can also create workflows to crop, rotate, rename images as you like.
Is this post helpful for you? Welcome to leave your comment or suggestion here.
Leave your comments here:
Recent posts
Categories
- Apple Infos (19)
- Application Guides (8)
- How-to Guides (25)
- Mac Apps (3)
- Mac Hardware (1)
- Mac Tips & Tricks (11)
- macOS (12)
- Security Issue (11)
- Tech News (14)
- Uninstall Tutorials (48)
Archive
- August 2021
- June 2021
- April 2021
- March 2021
- February 2021
- January 2021
- December 2020
- November 2020
- October 2020
- September 2020
- March 2020
- February 2020
- September 2018
- August 2018
- July 2018
- June 2018
- May 2018
- April 2018
- March 2018
- February 2018
- January 2018
- December 2017
- November 2017
- October 2017
- September 2017
- August 2017
- July 2017
- June 2017
- May 2017
- April 2017
- March 2017
- February 2017
- January 2017
- December 2016
- November 2016
- October 2016
- September 2016
- August 2016
- July 2016
Comments