Remove Mac Apps
A Technical Site Providing Uninstall Tutorial For Mac OS X
Create A Encrypted Disk Image to Protect Your Privacy
- Catherine
- Sep 08,2016
- 1729
Desired to create a secure container for your private files? Mac users can create a encrypted disk image using the built-in Disk Utility. You will be required to enter the password to open the encrypted disk image, and you can easily access your sensitive files stored in the encrypted disk like any other disk image. Interested in this topic? Read this post to learn how to create, mount & unmount a encrypted disk image.
To open the encryption application, open the Applications folder in Finder, click to open the Utilities folder, and click on the Disk Utility icon. You can also press Command + Space to open Spotlight search, type Disk Utility and hit Enter to open it. As the Disk Utility opens, click the New Image icon on the toolbar. Or you can click on the File menu, and choose New > Blank Disk Image to display a new window.
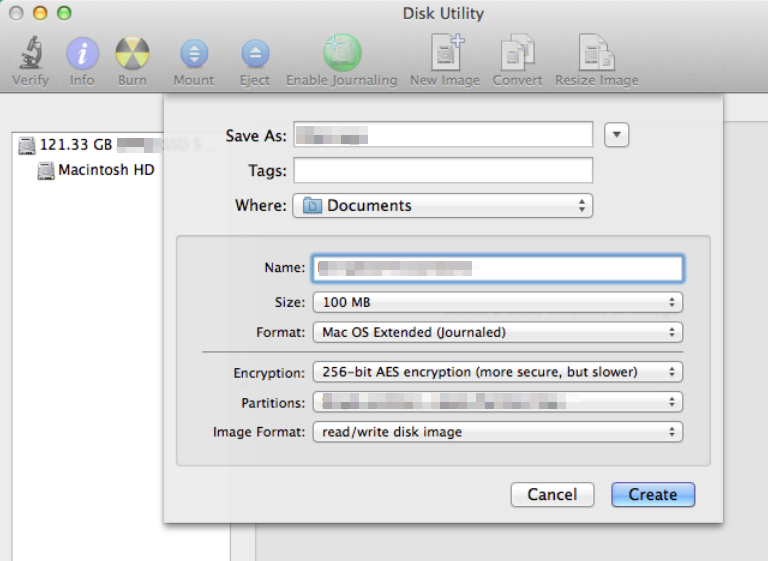
From there you can configure many settings about the encrypted disk. First type a name in the Save As field, which will be used for the disk image file. Then choose the save destination from the Where: drop-down menu. In the Name field, enter the name you want to display when the disk image file is opened. Then decide the size of the image file, and choose the Encryption option between 128-bit AES and 256-bit AES. You can use the default volume and image format as shown in the picture above.
Once you set up those configurations, click on Create button, and you will be prompted to enter and verify a encryption password for the created disk image. Your password strength will be estimated and you are supposed to use a strong password.
By default, this password will be saved in your account’s keychain, and it can be automatically filled in the future. You can uncheck this option if you don’t want it saved. Warning: the password is the only key to access to your encrypted disk, so make sure to keep it in mind if you choose not to store it in the keychain. If you forget your password, the data saved on that encryption disk image will not be retrieved.

Clicking on the OK button will create an encrypted disk image, and you will find it under the Devices section in the Finder. Now you can move your private files to this device. To unmount the disk image, you can click on the Eject button next to its name under the Devices. To mount it again, locate the file with the name you appointed and the .dmg file extension on your hard drive, then double click to open it. Then you will be asked to enter the password you set up during the creating encryption disk process.
Now you know how to use the encrypted disk to protect your personal data. You can read, copy or delete contents in the disk image. If you don’t use the encrypted disk, remember to unmount it, so that others won’t be able to access the files inside.
What do you think of this this encryption feature? Have you try Disk Utility on your Mac? Feel free to leave your suggestion here to help us improve this article.
Leave your comments here:
Recent posts
Categories
- Apple Infos (19)
- Application Guides (8)
- How-to Guides (25)
- Mac Apps (3)
- Mac Hardware (1)
- Mac Tips & Tricks (11)
- macOS (12)
- Security Issue (11)
- Tech News (14)
- Uninstall Tutorials (48)
Archive
- August 2021
- June 2021
- April 2021
- March 2021
- February 2021
- January 2021
- December 2020
- November 2020
- October 2020
- September 2020
- March 2020
- February 2020
- September 2018
- August 2018
- July 2018
- June 2018
- May 2018
- April 2018
- March 2018
- February 2018
- January 2018
- December 2017
- November 2017
- October 2017
- September 2017
- August 2017
- July 2017
- June 2017
- May 2017
- April 2017
- March 2017
- February 2017
- January 2017
- December 2016
- November 2016
- October 2016
- September 2016
- August 2016
- July 2016
Comments