Remove Mac Apps
A Technical Site Providing Uninstall Tutorial For Mac OS X
How to Share Windows 10 Files to Mac OS X
- Catherine
- Jul 07,2016
- 3829

It is quite convenient to share files between different devices using cloud storage providers such as Dropbox, Google Drive, or Microsoft OneDrive. But what if you want to share files from your Windows 10 to Mac OS X using the home or local network? Setting up a peer to peer network is an option of file sharing. In this tutorial we will show you step-by-step instructions to get the job done. Take a quick look.
First of all you need to enable the file sharing on your local Windows 10 computer:
- Right click on Start menu and choose Control Panel from the list.
- Click “Choose homegroup and sharing options” under Network and Internet section.
- Click “Change network location” link if the computer can’t find a Windows based homegroup on your network, and follow the on-screen prompts to finish the setup.
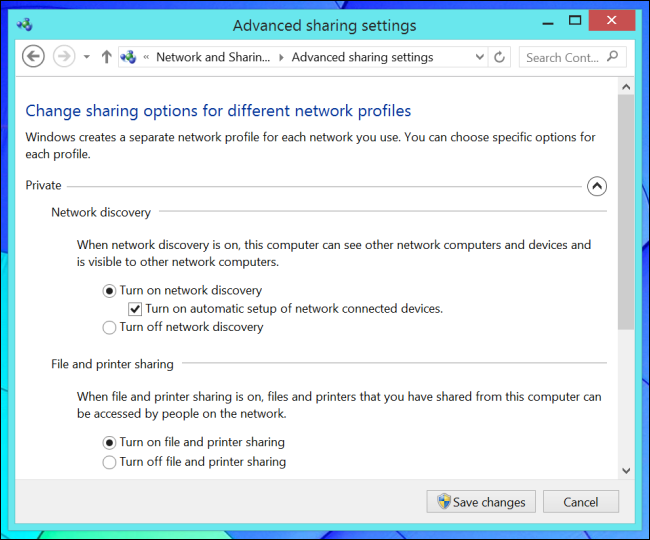
- Click the “Change advanced sharing settings” button to modify sharing options.
- Select the Private network, and enable the options of “Turn on network discovery” and “Turn on file and printer sharing”, and click “Save changes”.
- You can decide to turn on/off the password protected sharing setting.
The second thing you should do is to set up the file properties you wanna share:
- Locate the file/folder/driver you are going to share in the File Explorer.
- Right click on the file/folder, and choose Properties from the context menu.
- Click the Sharing tab in the Properties window, and click Advanced Sharing button.
- Tick the “Share this file” checkbox, and then click the Permission button below.
- Enable the Full Control under Permissions for Everyone, and click Apply button.
- Back to the Sharing tab, and take note of the Network Path of this file/folder.

Now you have successfully enabled the file sharing on your windows.
To share the file to your Mac, do the followings to connect your Windows and Mac devices:
- Open the Finder on your Mac, click the Go menu and click Connect to Server.
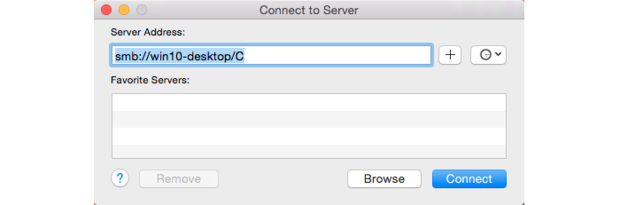
- Copy the Network Path of the Windows shared folder in the Server Address box.
- Prefix the address with “smb:”, and replace all backslashes (\) in the original address with forward slashes(/), for instance, smb://Win10-desktop/C.
- Click Connect button to build up the connection between your Mac and Windows share folder. Soon you will be prompted to “Connect as Registered Users” and to enter a valid Windows username & password with permission to access the share.
- Tick the “Remember password in my keychain” checkbox, and click Connect.
Done! The Windows shared folder now appears in Finder, and you would be able to read, write and copy files to your Mac. How about sharing files on your Mac with your Windows computer? We will update more details latter. Please stay tuned.
Leave your comments here:
Recent posts
Categories
- Apple Infos (19)
- Application Guides (8)
- How-to Guides (25)
- Mac Apps (3)
- Mac Hardware (1)
- Mac Tips & Tricks (11)
- macOS (12)
- Security Issue (11)
- Tech News (14)
- Uninstall Tutorials (48)
Archive
- August 2021
- June 2021
- April 2021
- March 2021
- February 2021
- January 2021
- December 2020
- November 2020
- October 2020
- September 2020
- March 2020
- February 2020
- September 2018
- August 2018
- July 2018
- June 2018
- May 2018
- April 2018
- March 2018
- February 2018
- January 2018
- December 2017
- November 2017
- October 2017
- September 2017
- August 2017
- July 2017
- June 2017
- May 2017
- April 2017
- March 2017
- February 2017
- January 2017
- December 2016
- November 2016
- October 2016
- September 2016
- August 2016
- July 2016
Comments