Record Screen Using QuickTime Player on Your Mac
- Catherine
- Jul 01,2016
- 3157

There must be many time when you need to record screen for purposes of teaching and training, communicating computer issues, making presentations, or sharing content with friends. But how to record screen on your Mac OS? Many new Mac users may not know yet that there is a cost-free screen recorder built-in to Mac beginning with OS X 10.6 and later. QuickTime is Apple’s default media application that can be used for screen recordings. So here comes the question: how to record your screen using Mac’s built-in QuickTime Player? Now check out this tutorial.
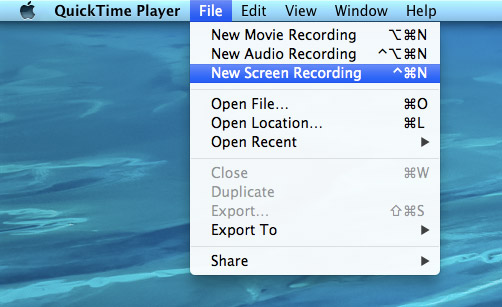
Launch QuickTime Player from the Applications folder, and you will see the Quicktime Player menu bar at the top. Click on File menu and choose New Screen Recording, or you can directly press control + command+ N keys together. Then you will see the screen recording window.

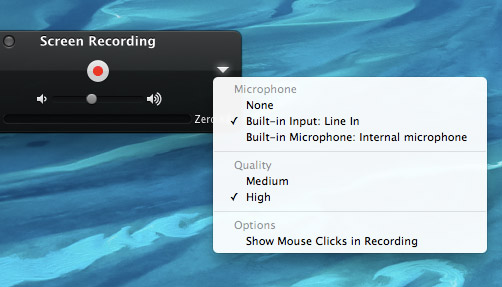
To adjust the desire settings, click the triangle drop-down menu of the right side of the window. You can decide the source for audio input, video quality as well as mouse click options there.

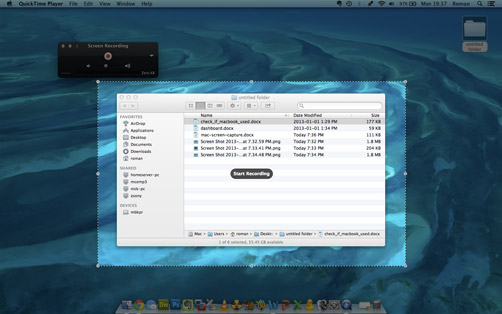
Now click on the red record button to start recording. You have the options to record your full screen, or you can click and drag a specific area of the screen to crop. The more larger area and higher video quality will result in larger files. Once you select the area, click to continue and the actions in the specific area will be recording instantly. When the recording is finished, click the Stop button that appears in the menu bar, and the recorded video will pop up. You can preview, share, and export to save it as a .mov file.

If you just want to shoot some simple videos for sharing and require no advanced functions, QuickTime should suffice, and it is remarkable simple to use. But if you need to make more longer and complex screen recordings, there are many recommended options such as Monosnap, Snagit, Camtasia, and ScreenFlow.
Leave your comments here:
Recent posts
Categories
- Apple Infos (19)
- Application Guides (8)
- How-to Guides (25)
- Mac Apps (3)
- Mac Hardware (1)
- Mac Tips & Tricks (11)
- macOS (12)
- Security Issue (11)
- Tech News (14)
- Uninstall Tutorials (48)
Archive
- August 2021
- June 2021
- April 2021
- March 2021
- February 2021
- January 2021
- December 2020
- November 2020
- October 2020
- September 2020
- March 2020
- February 2020
- September 2018
- August 2018
- July 2018
- June 2018
- May 2018
- April 2018
- March 2018
- February 2018
- January 2018
- December 2017
- November 2017
- October 2017
- September 2017
- August 2017
- July 2017
- June 2017
- May 2017
- April 2017
- March 2017
- February 2017
- January 2017
- December 2016
- November 2016
- October 2016
- September 2016
- August 2016
- July 2016

Comments