Remove Mac Apps
A Technical Site Providing Uninstall Tutorial For Mac OS X
Time Machine: How to Transfer Backups to A New Drive
- Jenny
- Sep 12,2017
- 1495
Wondering how to move your existing Time Machine backups to a new drive? When you need a larger drive to store your Time Machine backups, you might ask the question above. As the data you store on the external disk has grown over time, your original Time Machine hard drive will run out of space one day, and the older backups will be purged to make room for most current data. So if you want to store data history as more as possible, it is time to upgrade to a new, larger drive for backups.
![]()
To transfer Time Machine from a current backup drive to a new one, you need to perform a series of actions in the right sequence to ensure the right backup:
Step 1. Prepare a new backup drive (format & permission)
After you connect your new drive to your Mac, you are supposed to first check if it is formatted for Mac compatibility. To do so, open the Disk Utility from the Utilities folder in Finder, select the new drive’s icon, and check the information a the bottom of Disk Utility to see if it has a GUID partition and is formatted as Mac OS Extended (Journaled). If it does not yet, do the following to reformat it for later use.
Before reformatting the drive, make sure to back up the files you need to retain in the drive. Then select the drive icon in Disk Utility, click Erase, and separately choose “Mac OS Extended (Journaled)” in the “Format” window and “GUID Partition Map” in the “Scheme” window. After that, click Erase button to start reformatting the drive.
Besides, there is one more thing you need to verify, that is, to set permission on the new drive. To do so, open a new Finder window, click the drive icon in the sidebar, and choose Get Info from the File menu. Now make sure the “Ignore ownership on this volume” at the bottom of the “Sharing & Permissions” section is unchecked.
Step 2. Copy backup data from original drive to the new one
As both the original and new drives are connected to your Mac, you are able to start to transfer backups now. Note that you should turn off Time Machine temporarily to stop updating backup files in original drive (to do so, launch Time Machine via the Apple menu > System Preferences, and then slide the Time Machine Switch to Off).
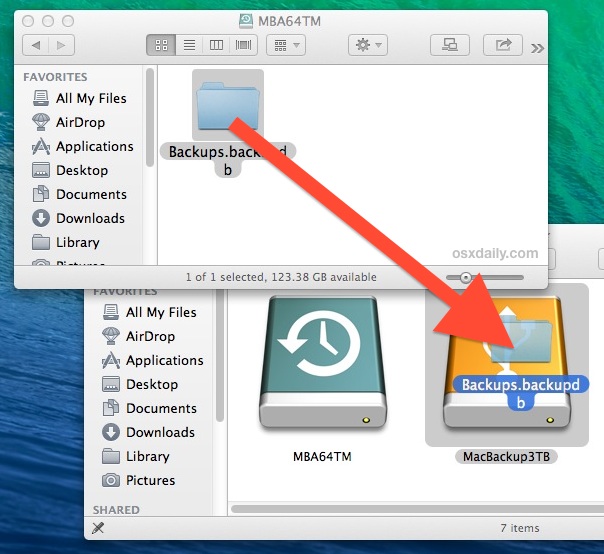
To move the backup data from original drive to the new one, (1) open a Finder window, and click the original drive icon in the sidebar; (2) open another Finder window, and click the new drive icon in the sidebar; (3) select and drag the folder labeled “Backups.backupdb” from the original backup drive to the top level of the new backup drive; (4) when prompted, enter your admin password to start the copying process. The whole process may take time to complete, so be a little patient.
Step 3. Set Time Machine to backup with the new drive
After the transfer finishes, you will need to do the last step, that is , to set up Time Machine to use the new drive. To do so, launch Time Machine via System Preferences, click the “Select Disk” in the Time Machine preferences window, select the new drive and click Use Disk. Then your Time Machine will automatically turn back on and use the drive to store backup files. If not, you can also manually flip the Switch back on.
So, that’s how you can transfer Time Machine backups from current drive to a new one. If your new drive has been formatted and set up for right permission, the rest work is quite easy to complete. Keep using Time Machine on your new drive!
Leave your comments here:
Recent posts
Categories
- Apple Infos (19)
- Application Guides (8)
- How-to Guides (25)
- Mac Apps (3)
- Mac Hardware (1)
- Mac Tips & Tricks (11)
- macOS (12)
- Security Issue (11)
- Tech News (14)
- Uninstall Tutorials (48)
Archive
- August 2021
- June 2021
- April 2021
- March 2021
- February 2021
- January 2021
- December 2020
- November 2020
- October 2020
- September 2020
- March 2020
- February 2020
- September 2018
- August 2018
- July 2018
- June 2018
- May 2018
- April 2018
- March 2018
- February 2018
- January 2018
- December 2017
- November 2017
- October 2017
- September 2017
- August 2017
- July 2017
- June 2017
- May 2017
- April 2017
- March 2017
- February 2017
- January 2017
- December 2016
- November 2016
- October 2016
- September 2016
- August 2016
- July 2016
Comments